Knowing your vehicle: Changing brake shoes step by step
Published: Sunday | January 11, 2009
EVERYONE changes brake pads regularly. Front pads are the first to fade away, and nine times out of 10 they are the cause of that horrible screeching sound that occurs when they are worn and the brakes are applied.
The rear drums are almost like an afterthought; cars sometimes go their whole productive life without the drum brakes being serviced, but they are just as important!
Automotives in a series of articles will guide you through the process, but first there are a few safety measures we need to cover.
If your car is an older model (dating back to the '70s) please use water and wet down the brake area first! The pads were made from asbestos back then, and dust generated by these older pads is a known carcinogen and may have long-term health effects. Also, if your shoes are worn down to the metal, inspect the drum for scoring. If the drum has grooves then the car needs to be taken to a professional for service.
Drum brakes were the cat's meow during the '50s and '60s. The Jaguar concern, in collusion with Dunlop, brought out the first discs in the early '50s and fitted them to their endurance racers (XK120 and D Types) and the advantages were obvious: more braking area, less fade, and it made changing friction material so simple!
Drum brakes, however, retained heat, which meant more fade, and because of their inefficient use of the brake area, it took more pedal pressure to stop. But, drum brakes did not die, they were just relegated to the back of the car.
Under braking, a vehicle's weight bias shifts to the front, and that's where as much as 80 per cent of the stopping takes place (that's why they wear so little.) The most efficient system is used for the front, and it is much easier to put the emergency on drums than discs, from a manufacturer's point of view.
The job at hand
Tools needed: A scissors jack, or lifting device that comes with your car; tyre irons, also compliments of the auto manufacturer; assorted combination spanners, available in both metric or standard from local tool houses like National Supply or True Value; a couple of screwdrivers and a stout pair of pliers; again, your friendly neighbourhood tool stockist/hardware should have them. And away we go!

1. How inconspicuous and simple looking! After jacking up the car, taking off the hubcap, lug-nuts and road wheel, this is what we're faced with. The arrow points to a Phillips head screw that must be removed before we proceed.
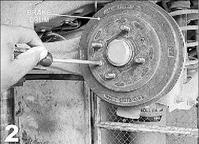
2. There are two main means of securing the drum; by screws (as shown here) and locator or dowel pins, in which case the drum is held on by the lugs which hold on the road wheel. Grasp firmly about the outer surface and wiggle until it comes off. If it proves obstinate, gently use a hammer and screwdriver combo and pry it off and you should see something like.
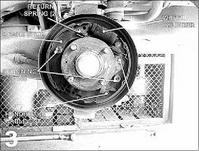
3. The wheel cylinder is the 'motor' of the whole situation. It responds to pedal input via a hydraulic circuit, and forces the brake shoe against the inside of the brake drum. The spring loaded retaining pins also act as pivots, causing the brake shoe to travel in an arc, as well as maintaining both shoes in the same plane.
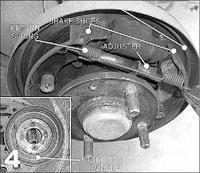
4. Using a pair of lineman's pliers, grip one end of the return spring and unhook it from its perch on the brake shoe. Remove and store in drum (see inset). Note that there may be another return spring between the brake shoe and backplate. Also note positioning of the handbrake adjuster, in the top of this picture. To do a proper brake job, we will need to use it, but later.
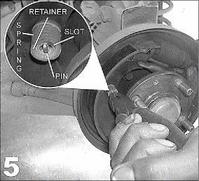
5. Again, using the pliers, compress the spring loaded retaining spring then grasp the pin itself and turn it until it lines up with the slot in the spring retainer (see call out) and release the pressure. Be careful while doing this, you don't want the spring to pounce at you.
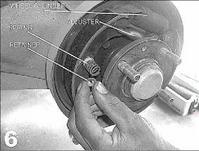
6. It looks like this when dismantled. Not much further to go, now. Take note of how the handbrake adjuster attaches to the shoe. Don't forget to remove the pin on the other side.
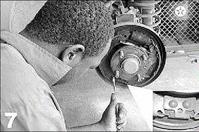
7. There may be another spring at the south end of the mechanism. Here, Jason Stewart, mechanic, uses a flathead screwdriver to remove it by slipping it into the loop at one end of the spring and prying it loose (see insert).Your car may or may not have this spring; if not, then skip this step.
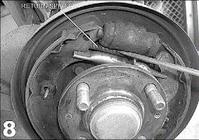
8. Do the same for the spring previously mentioned in Figure 4. It's a little fiddly, but with patience, you'll pull through.
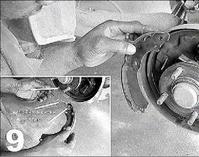
9. LIFTOFF! Feel the sense of accomplishment. But we're not done yet. The handbrake lever has to be removed from the old shoe by removing the attached handbrake cable, spreading its retaining clip lifting off the lever off its pin and installing it on the new brake shoe. Installation of new shoes is basically the same as removal but in reverse. However, a few pointers.
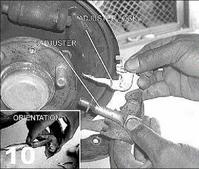
10. After removing the brake shoe with the handbrake lever on it a spiky piece of metal should have dropped out. This is the adjuster lock, and it serves to stop the adjuster from turning. The adjuster is used to position the brake shoes so that they hover just above the drum surface. Check the orientation of this part in relation to the adjuster, and finish the process.
Now, a disclaimer: Some of you may have brakes that don't look anything like we have portrayed. If you see anything radically different when you take off that drum or dismantle the disc mechanism, please don't go any further with the procedures outlined here.
Instead, email mario.james@gleanerjm.com with pictures of your brakes and we'll take it from there. To everyone else, good luck!
Next: Adjusting your handbrakes.
